|
|
Samsung TV blacking out - change dns
|
Revised: 3/14/2017
Owner: Administrator |
set DNS to 8.8.8.8.8 or 8.8.8.4.4
samsung TV change DNS because TV blacking out
https://www.smartydns.com/support/how-to-set-up-smart-dns-on-samsung-smart-tv/
https://www.smartydns.com/support/how-to-set-up-smart-dns-on-samsung-smart-tv/
How to set up Smart DNS on Samsung Smart TV
Follow the instructions step-by-step to set up Smart DNS on Samsung Smart TV.
-
Validate your IP Address.
If you have validated your IP address, skip this step and go to part II of this tutorial.
- Sign in to your Client Area.
- Go to “Packages”.
- Choose your package.
- Choose the “Smart DNS” tab.
-
Click the “Validate IP” button (1).
Please go to part II of this tutorial if you see the “Your IP address has been validated!” message.
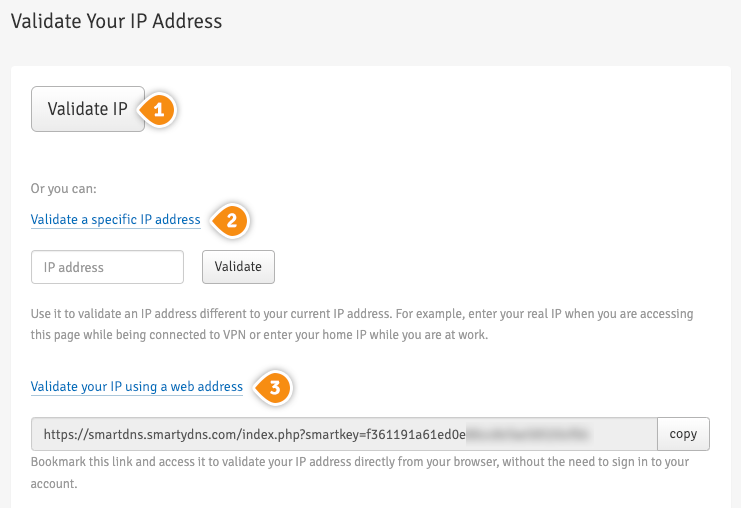
Another option is: validate your IP addresses instantly through “Validate IP Link” (2). By choosing this option you don’t have to sign in to your Client Area each time you want to validate the IP address. By adding this link to your browser favorites/bookmarks your IP address will be validated each time you load this URL into your browser.
If our service is not functioning, please validate your IP address again by following steps 1-4. Your IP address have to be validated every time it changes.
It is important to not share the Validate IP Link with anyone! It is particular and unique for every single client. If you give or share it with other people, your Smart DNS service won’t be working.
-
Change your Samsung Smart TV DNS server addresses
This has to be done only once.
Before you switch to our DNS addresses, make sure you write down your current DNS addresses, so you can keep these numbers in case you need to get back to your original settings. If your original configuration were set to “Automatic”, just change your DNS settings back to “Automatic” in order to get back to your original settings.
In order to be able to see US or UK channels you have to change the region on your TV. To do that, just follow our tutorials for Samsung Smart Hub, Samsung Smart TV F Series or H Series.
-
Press “Menu” button on your remote.
-
Under “Settings menu” select “Network” (1) then choose “Network Status” (2).

-
After several seconds you will see 3 buttons. Choose the “IP Settings” button (3).

-
Choose “DNS setting” (4).

-
Select “Enter manually” (5).

-
Enter the SmartyDNS DNS addresses (6). You can find them in your Client Area -> Packages -> your package. then press “OK” and you are done!

|
|
|
Samsung TV blacking out - change dns
|
set DNS to 8.8.8.8.8 or 8.8.8.4.4
samsung TV change DNS because TV blacking out
https://www.smartydns.com/support/how-to-set-up-smart-dns-on-samsung-smart-tv/
https://www.smartydns.com/support/how-to-set-up-smart-dns-on-samsung-smart-tv/
How to set up Smart DNS on Samsung Smart TV
Follow the instructions step-by-step to set up Smart DNS on Samsung Smart TV.
-
Validate your IP Address.
If you have validated your IP address, skip this step and go to part II of this tutorial.
- Sign in to your Client Area.
- Go to “Packages”.
- Choose your package.
- Choose the “Smart DNS” tab.
-
Click the “Validate IP” button (1).
Please go to part II of this tutorial if you see the “Your IP address has been validated!” message.
Another option is: validate your IP addresses instantly through “Validate IP Link” (2). By choosing this option you don’t have to sign in to your Client Area each time you want to validate the IP address. By adding this link to your browser favorites/bookmarks your IP address will be validated each time you load this URL into your browser.
If our service is not functioning, please validate your IP address again by following steps 1-4. Your IP address have to be validated every time it changes.
It is important to not share the Validate IP Link with anyone! It is particular and unique for every single client. If you give or share it with other people, your Smart DNS service won’t be working.
-
Change your Samsung Smart TV DNS server addresses
This has to be done only once.
Before you switch to our DNS addresses, make sure you write down your current DNS addresses, so you can keep these numbers in case you need to get back to your original settings. If your original configuration were set to “Automatic”, just change your DNS settings back to “Automatic” in order to get back to your original settings.
In order to be able to see US or UK channels you have to change the region on your TV. To do that, just follow our tutorials for Samsung Smart Hub, Samsung Smart TV F Series or H Series.
-
Press “Menu” button on your remote.
-
Under “Settings menu” select “Network” (1) then choose “Network Status” (2).
-
After several seconds you will see 3 buttons. Choose the “IP Settings” button (3).
-
Choose “DNS setting” (4).
-
Select “Enter manually” (5).
-
Enter the SmartyDNS DNS addresses (6). You can find them in your Client Area -> Packages -> your package. then press “OK” and you are done!
|
|
3/14/2017
|
|
info
|
|
Administrator
|
|
|
|
|
|
|